# How to use buttons and scripts from this forum
**URL:** https://resource.dopus.com/t/how-to-use-buttons-and-scripts-from-this-forum/3546
**Category:** Buttons/Scripts
**Tags:** script, button
**Created:** [May 6, 2007, 9:01am UTC](https://resource.dopus.com/t/how-to-use-buttons-and-scripts-from-this-forum/3546 "2007-05-06T09:01:24Z")
**Posts on this page:** 3
**Page:** 1
This post explains how to add **buttons** to **toolbars** and **menus** , and also applies to raw commands for things like standalone hotkeys.
For how to use **Script Add-Ins** , please scroll down to the post below this one.
* * *
**See Also** : The manual has more detail in [Editing The Toolbar](https://docs.dopus.com/doku.php?id=customize:creating_your_own_buttons:editing_the_toolbar) and the [Customize](https://docs.dopus.com/doku.php?id=customize) section in general.
* * *
Buttons and toolbars can be shared in several different ways.
## Raw Commands
Posts often contain commands which you can put in a button, hotkey or menu. For example:
```plaintext
Copy INSTALLFONT
```
To create a toolbar button which runs that command:
1. Select **Settings -\> Customize Toolbars** (the Customize window will open; keep it open but move it out of the way)
2. Back in the main window, right-click your toolbar somewhere and (depending on where you clicked) there will be a **New** or **Insert New** sub-menu. Click that sub-menu, and then **New Button**.
3. Right-click the button that was just added and choose **Edit**. (Or double-click the button.)
4. Prior to Opus 13:
_For single-line commands:_ Paste the command into the **Function** field.
_For multi-line commands:_ Click the **Advanced** button, then paste the command into the big area at the bottom.
5. Click **OK** in the button editor, then **OK** in the Customize window.
For more details, see [Editing the Toolbar](https://docs.dopus.com/doku.php?id=customize:creating_your_own_buttons:editing_the_toolbar) in the Opus manual.
* * *
## XML Button Definitions
Some posts contain blocks of XML which define all aspects of a button (or even a menu containing several buttons).
These blocks of XML define not just the command (like in the _Raw Commands_ example above), but also the button's icon, label and other attributes.
Don't worry, you don't need to know anything about XML. You just need to copy the text and paste it to your toolbar to create the button.
Here is an example:
```xml
```
(What the button does isn't important for this explanation but, if you are wondering, it installs any selected font files into your system.)
Here's how to take the code box above and turn it into a button in a toolbar or menu:
1. In your web browser, copy the contents of the code box to your clipboard.
2. Switch to Opus and enter Customize mode via the menu: **Settings -\> Customize Toolbars**
3. Find where you want to put the new button in your toolbars or menus, then right-click that place and select **Paste**.
4. (Optional)
5. Click **OK** in the Customize dialog to exit Customize mode and save your changes.
(See also: [Sharing functions with others](https://docs.dopus.com/doku.php?id=customize:creating_your_own_buttons:editing_the_toolbar:sharing_functions_with_others), in the Opus manual.)
* * *
## Toolbar .dop Files
A few posts contain entire toolbars, in .dop files. To load one, simply double-click it and Opus will import it.
* * *
# Button .dcf Files
Individual buttons can be stored as .dcf files by dragging them to your desktop while in Customize mode.
⚠ If you double-click a .dcf file it will _run_ the commands inside it. ⚠
(If you open a .dcf file in a text editor, you'll see it is similar to the XML codes shared on the forum. It's really just another way of storing the same data.)
To add a button from a .dcf file to your toolbar:
1. Download the .dcf file and navigate to where it is. (If it is inside a zip, extract it first.)
2. Select **Settings -\> Customize Toolbars**.
3. Drag the .dcf file to your toolbar.
4. Click **OK** in the Customize window.
* * *
# Scripts: Continue to the post below...
---
# Scripts
Scripts are usually written in JScript (a version of Javascript) or VBScript.
Scripts may be shared on the forum in a few different ways.
* * *
## Script Buttons
These are like regular toolbar buttons, except they contain script code.
If they are shared as **XML** code or **.dcf** files then you can add them to your toolbars the same as you would a button containing non-script commands. See the **XML Button Definitions** and **Button .dcf Files** sections of the post above for how do that.
If someone posts some raw script code which starts with an `OnClick` method, that is usually intended to be placed in a button.
For example, here is some simple JScript that goes in a button:
```javascript
function OnClick(clickData)
{
DOpus.Output("Hello World");
}
```
Creating a new button to run that script is exactly the same as the **Raw Commands** part of the post above, with two extra steps:
1. When you edit the empty button, set the **Function** drop-down to **Script Function**.
2. Change the **Script Type** drop-down to **JScript** or **VBScript** as appropriate.
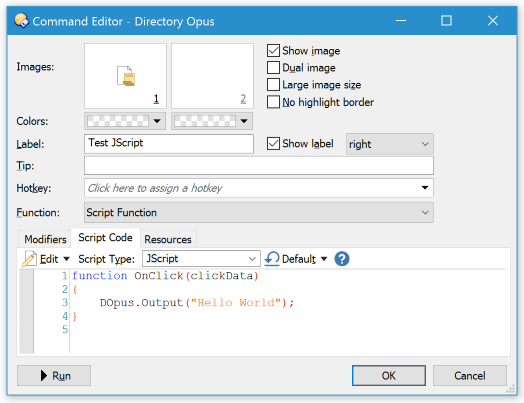
Before Opus 12, instead of the **Script Type** drop-down, scripts in buttons would begin with a line like:
```plaintext
@script jscript
```
That served the same purpose as the drop-down. (In fact, that line is still there behind the scenes, and you'll see it if you look at the button's XML code. The button editor UI just turns the line into a nicer drop-down.)
* * *
## Rename Scripts and Presets
Rename scripts will typically be provided as part of a Rename Preset (.orp file), which can be imported into the Rename dialog.
See the separate topic, [How to use Rename Presets from this forum](https://resource.dopus.com/t/how-to-use-rename-presets-from-this-forum/26726).
* * *
## Script Add-Ins
Script Add-Ins are like extensions or plug-ins for Opus, written in a scripting language. They can add custom commands to use in buttons, and custom columns to show in the file display. They can be triggered on events (e.g. changing folders) and alter the way Opus behaves. And various other things.
Script Add-Ins are managed under **Preferences / Toolbars / Scripts**.
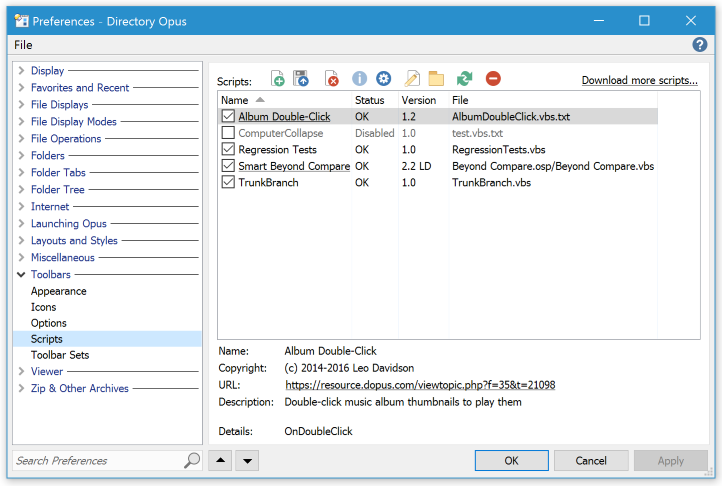
If you look at the code for a Script Add-In, it will almost always have an `OnInit` function, usually near the top.
There are three ways someone might share a Script Add-In on the forum:
1. As a downloadable script file, usually with a **.js.txt** or **.vbs.txt** extension.
2. As a downloadable _script package_, with a **.osp** extension:
3. As script code pasted into a message:
---