(Requires Opus 11.16 or above.)
Overview:
This script allows you to trigger different actions based on where the mouse is.
For example, you might have a multi-monitor setup where the screens are different sizes and aspect ratios. You could set Desktop Double-Click to run the script, and then configure the script to launch a different Lister Layout for each monitor, so you always get a layout customized to the monitor you were on when you double-clicked.
As another example, you might divide a single screen into 4 areas and launch different things when the mouse is in each area.
By default, the script sets up one area for each monitor, but you can change this via the script's configuration.
Installation:
- Download Area_Command.js.txt (2.09 KB)
- Open Preferences / Toolbars / Scripts and drag the file to the list of scripts.
- Click OK.
Configuration:
Go to Preferences / Toolbars / Scripts, select the Area Command script, and click Configure; you'll see something like this:
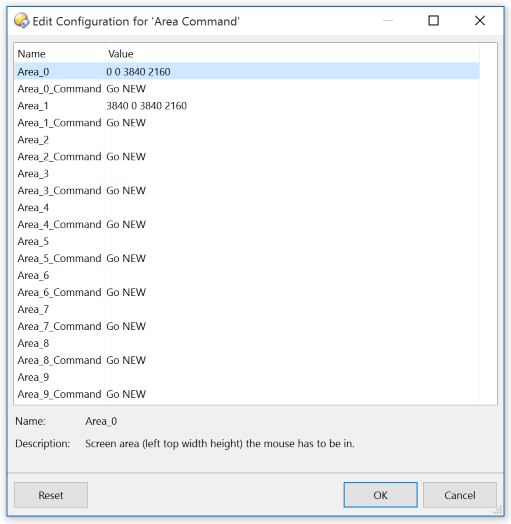
By default, there will be one area defined for each of your monitors. You can edit the areas to be whatever you want by double-clicking on them. Each area is defined in screen coordinates, in the order Left Top Width Height.
Below each area is the corresponding command to run, set to Go NEW by default, which opens the Default Lister. If you want to open a particular layout, the command you want would be something like Prefs LAYOUT="My Layout" but you can run any command you wish, including triggering external programs.
If you need to run a multi-line command, at the moment you will need to create a user-defined command and then configure the script to run that. (The ability to specify multi-line commands directly in the config dialog could be added if there is demand for it. I have kept things simple for now, as I expect most people will just want to launch a layout or similar.)
After making changes to the configuration, click OK in the script's configuration window and then click OK or Apply in the main Preferences window to save them.
Setting up Desktop Double-Click:
The main use of the script is probably with Desktop Double-Click. You have to jump through a couple of hoops to hook this up at the time of writing. You need to create a (very simple) user-defined command.
Here's how to do it:
- Go to Settings > Customize Toolbars > Commands, then expand the User-defined Commands section.
- Double-click Add new User Command...
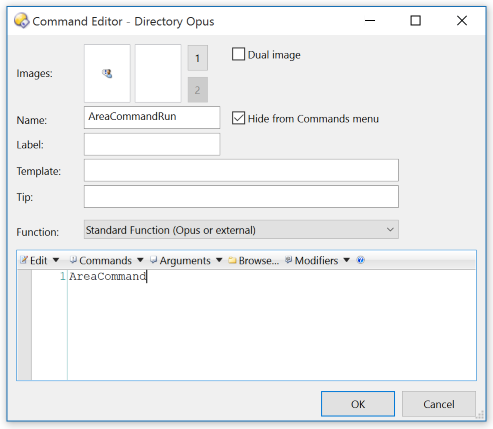
- In the Name field, put AreaCommandRun (this is the name of the command you are adding).
- (Optional) Select Hide from Commands menu to keep things tidy.
- In the main command editor, put AreaCommand (this is the command that runs the script).
- Click OK in the button editor and then OK to close the Customize window.
- You can now go to Preferences / Launching Opus / From the Desktop, then choose Run a defined User Command... and select AreaCommandRun from the list.
Need more than 10 areas?
If you need more than 10 areas, select the script in Preferences, then click Edit. Find the line near the top which says numAreas = 10; and change it, then save the file.
History:
- v1.0 (02/Sep/2015) - Initial version.
The script itself:
If you just want to use the script, the Area_Command.js.txt download above is easier.
The script code is reproduced here so people looking for scripting techniques can browse the script code on the forum without having to download it and open a file.
// Area Command
// (C) 2015 Leo Davidson
//
// This is a script for Directory Opus.
// See http://www.gpsoft.com.au/DScripts/redirect.asp?page=scripts for development information.

numAreas = 10;

function OnInit(initData)
{
	initData.name = "Area Command";
	initData.desc = "Run different commands when the mouse is in different areas.";
	initData.copyright = "(C) 2015 Leo Davidson";
	initData.version = "1.0";
	initData.default_enable = true;
	initData.min_version = "11.15.3"

	var cmd = initData.AddCommand();
	cmd.name = "AreaCommand";
	cmd.method = "OnAreaCommand";
	cmd.desc = "Run different commands when the mouse is in different areas.";
	cmd.label = "AreaCommand";
	cmd.template = "";

	monitors = DOpus.Create.SysInfo.Monitors;
	descs = DOpus.NewMap();
	for (i = 0; i < numAreas; ++i)
	{
		initData.config[ "Area_" + i ] = GetMonitorRect(monitors,i);
		initData.config[ "Area_" + i + "_Command" ] = "Go NEW";
		descs( "Area_" + i ) = "Screen area (left top width height) the mouse has to be in."
		descs( "Area_" + i + "_Command" ) = "Command to run when the mouse is in the corresponding area."
	}
	initData.config._descriptions = descs;
}

function GetMonitorRect(monitors, idx)
{
	if (idx >= monitors.count)
		return "";
	r = monitors(idx);
	return r.left + " " + r.top + " " + r.width + " " + r.height;
}

function IsInRect(strRect, x, y)
{
	coords = strRect.split(" ");
	if (coords.length < 4)
		return false;
	l = parseInt(coords[0]);
	t = parseInt(coords[1]);
	r = parseInt(coords[2]) + l;
	b = parseInt(coords[3]) + t;
	return (x >= l && x < r && y >= t && y < b);
}

function TrimString(s)
{
	return s.replace(new RegExp("^ *(.*?) *$"),"$1");
}

function OnAreaCommand(scriptCmdData)
{
	sysInfo = DOpus.Create.SysInfo;
	x = sysInfo.MousePosX;
	y = sysInfo.MousePosY;

	cfg = Script.config;
	for (i = 0; i < numAreas; ++i)
	{
		if (IsInRect(cfg[ "Area_" + i ], x, y))
		{
			cmdLine = TrimString(cfg[ "Area_" + i + "_Command" ]);
			if (cmdLine != "")
			{
				scriptCmdData.func.command.RunCommand(cmdLine);
				break;
			}
		}
	}
}
Help finding screen/area coordinates:
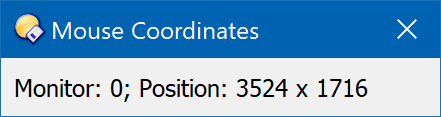
Use this companion script if you need help finding the coordinates of different areas on your screen(s). This can be especially under mixed DPI systems where the coordinates can be more complex.
It will show a window reporting the mouse coordinates as the scripting API sees them, which you can plug into the Area Command script.
To use the companion script:
-
Download Mouse Coords.js.txt (1.7 KB)
-
Open Preferences / Toolbars / Scripts and drag the file to the list of scripts.
Alternatively, copy it to the /scripts folder (same end result):
-
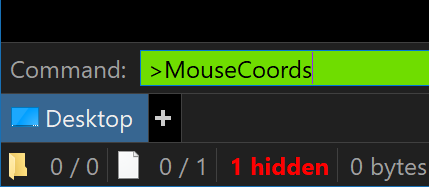
Then type
>into a file display to open a command field, typeMouseCoordsand push return.