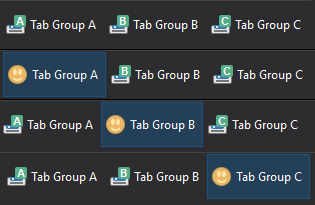
There are 2 different samples going on here. One on the same toolbar line and one below. It's not built dynamically and would need to be updated manually if you add/remove tab group buttons.
One alternative would be to use the icon to indicate what one was pressed. See @icon. You would need two sets of icons, one set being grey one colour. Set the buttons default icon to the grey one, and when you click the button it would change to a colour one.
The button command would look like this.
Meaning, Set the button icon to MyTabIcons:TheColourIcon1 if global var MyTabIcons+TheColourIcon1 is set.
To make this work the buttons also need to manipulate some global variables. You would need one global var for each button. Pressing the button would set its variable, and clear all others. So the buttons code is no simpler than @yonder's suggestion.
Here is another idea... (like you need one!)
Everytime I leave one of my tabs at the top
i.e I move from Downloads to Ad-hoc say
I have to save the set folders I have open down the left hand side
I dont suppose this could be automated could it?
That should be possible, but I think you will need a custom script.
If you feel like writing a script there are events for things like switching folders and tabs many more. You can then change global variables, Dopus settings, tweak buttons, or run Dopus commands.
Best to start here Scripting.
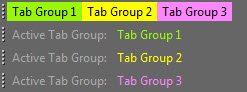
To recreate this with the Active Tab Group name appearing to the right:
You'll need to create new toolbars, one for each Tab Group button. Don't worry where they are positioned, that will be controlled by the buttons.
On each toolbar, create labels or buttons that help indicate which Tab Group is active (Everything in the screenshot below is a button with "No highlight border" turned on, placed within 4 toolbars).
I'm only showing the code that works with 3 Tab Group buttons. You'll need to adjust for your needs. I'm sure you'll notice a pattern here.
On the Tab Group 1 button, add this code below any code you already have there that calls that Tab Group. Change "test TGx" to your actual toolbar name. Change "Line=2,250" to your toolbar position and number of pixels in from the left that you want this toolbar to be placed. Remember, toolbars are counted starting at 0 (zero). The 250 indicates how many pixels in from the left.
Toolbar "test TG1" STATE=top LINE=2,250
Toolbar "test TG2" CLOSE
Toolbar "test TG3" CLOSE
On Tab Group 2 button, you'll want to add this code (changing the details as needed).
Toolbar "test TG1" CLOSE
Toolbar "test TG2" STATE=top LINE=2,250
Toolbar "test TG3" CLOSE
On Tab Group 3 button, you'll want to add this code (changing the details as needed).
Toolbar "test TG1" CLOSE
Toolbar "test TG2" CLOSE
Toolbar "test TG3" STATE=top LINE=2,250