Using Directory Opus 13.
I wanted to see word documents in a folder not just as a list of documents but also with each document a sort of TOC (table of contents). Think of a series of Word docs as a book or a research project, where each word document is a chapter (the names starting with numbers, for instance), and all the headers (like H1, H2 etc.) as the sub-titles of each chapter. Together, they form a TOC across all documents in the folder. Each main topic is a Word document, but you want to see the overview of the entire thing - and you don't work with a single, gigantic Word document.
Part of my own fancied solution is a VBA macro running in Word (which is fully accessible if it is saved in the "normal.dotm" file, as Word developers know). This macro however can also be run from Directory Opus (DO) by right-clicking on the Word document and run the macro from the context menu, as I will explain. But the visualisation itself is something that could be achieved through DO's powerful tuning options, most particularly its TILES view.
I created a test set with a number of dummy documents. Some have 11 or 12 headers (which had to be displayed in the overview, each within its own tile) - this is more than will normally fit within a normal tile - so the tiles had to be enlarged. Each TOC entry needs a line, and for the height of the tiles it seemed reasonable to show up to 5 TOC entries, something like that. I also needed an indicator saying that not the entire TOC of a document is displayed, so I knew I had to hovering the mouse over the tile - which should show all entries (using the "Info tip" functionality of DO). That was the overall idea.
Unfortunately, tiles cannot automatically adapt their size according to what has to be displayed. Increasing the fixed tile size in DO is virtually unlimited, but making them larger than, say, 5 lines, will result in more empty space in the tiles on average, as more tiles will show up that have a smaller TOC to show.
Below is a screenshot of a folder with some dummy Word documents (I had some fun inventing titles) representing a mix of different documents with a TOC of 1 to 12 entries each.
Screenshot of the test folder:
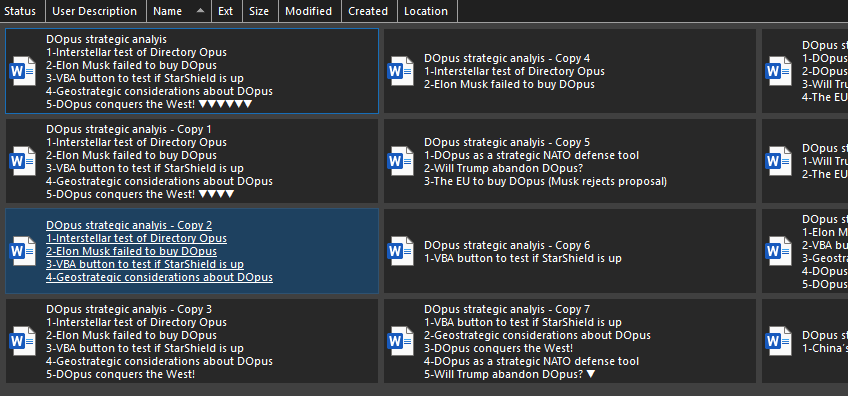
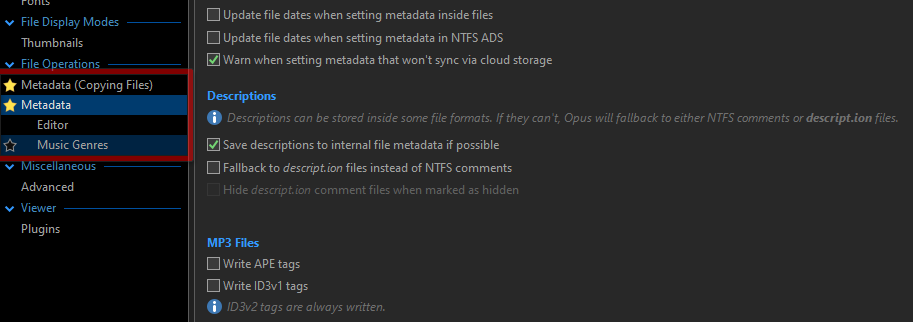
The TOC inside each document is displayed in yellow (only a single level, H1 let's say - I was not interested in displaying complex title structures). What is displayed is in fact the Info/comments field of the Word document - which DO automatically maps to the "description" and "userdescription" columns (I used the latter). The TOC is properly listed because the vba-macro adds a CR/LF after each TOC entry. The comments are put there by a vba macro in Word (which is stored centrally for all Word documents in the normal.dotm file).
Notice that DO does not support adding CR/LF in a multi-line dialog field - but it displays them properly if they are there already. If you would edit the description via DO's metadata editor or via a scripted dialog, then save the comment in DO, everything after the first CR/LF will be lost. (Of course: there's no reason to edit it outside of Word). The macro also puts an incremental number in front of each entry, and for every entry larger than 5 it adds a small triangle after the last visible subject (the location of the small triangle(s) - line 5 in this case - can be adapted in the Word macro). With one triangle per non-displayed subject you can instantly see how many subjects are out of sight, and you just need to over the mouse over the tile to instantly see the rest).
Here is a screenshot with the mouse hovering over the second document:

As you can see, all header subjects now appear in the Info tip. There is a setting in DO to expand the tile when you click on it though - but that tile then overlaps the tile underneath it, until you click away from it... But I found the Info tip mechanism more convenient (especially after making it appear faster than after the standard 1000 milliseconds in DO - yes, you can tune that one too).
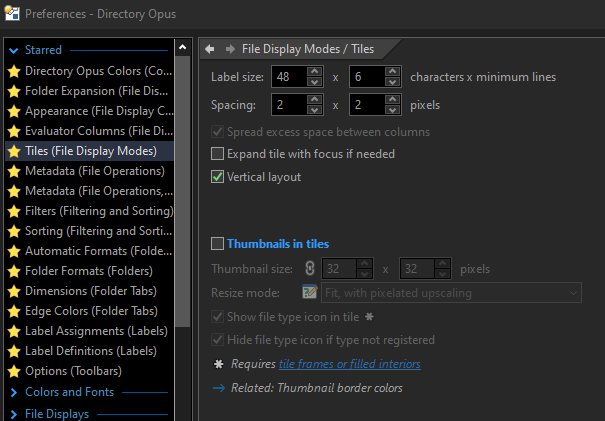
My choice of showing max. 5 subjects is something like choosing the middle road. You will either need to hoover more often, or scroll through more half-empty tiles.
The configuration of the Tiles and Info tip in DO is as follows (tile size is called 'label size' in the preferences):
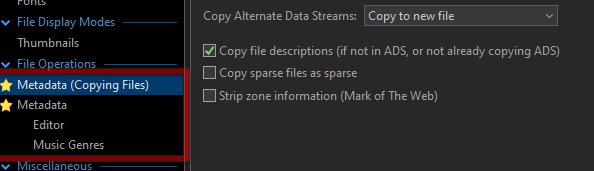
Now comes a more complicated part. I'll first add a picture collage of actions to take:
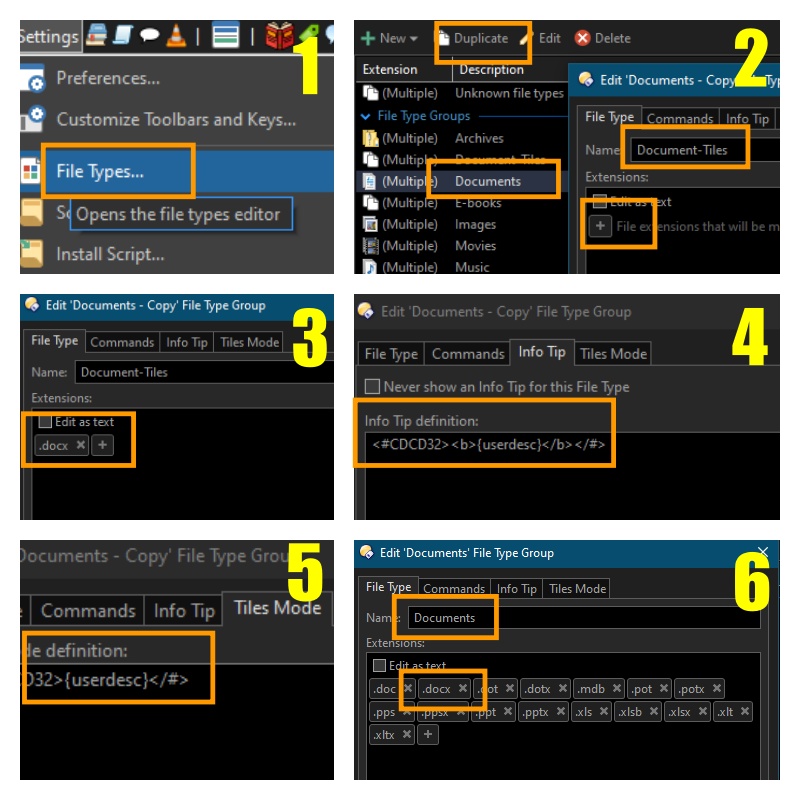
(1) In Settings, open the "File types".
(2) Click on Documents, then on Duplicate, give the new file tipe a different name (e.g. Document-Tiles), and click the [+] sign in the 'File Type' tab.
(3) Type docx (or doc, whatever type of Word docs you happen to use).
(4) In the 'Info Tip' tab, add the "{userdesc}" field, optionally adding some make-up code too (I originally used yellow and bold, but later I just defined the {userdesc} field).
(5) Copy the info tip code ({userdesc}) to the 'Tiles Mode' tab as well.
Confirm, so the dialog closes.
(6) Finally, edit the original "Documents" entry and remove the docx extension there (or whatever extension you just configured).
While the setup of the tiles can be limited to folders of your choice (see further on), its actual content and the Info tip are linked to a file type, which is a different mechanism not connected in any way to the setup of the TILES - which is a bit unfortinate. It turns out the 'Documents' and the new 'Document-Tiles' entry must not have overlapping file types either (if you define doc and/or docx, docm in the original 'Documents' type and in the new one, DO may not act as expected).
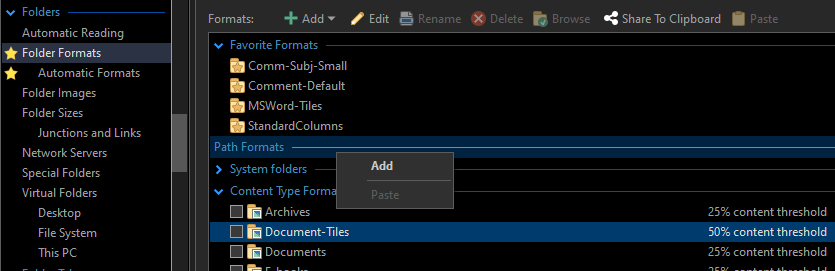
We're not done yet. We still need to create path formats for localized use in one or more particular folders.
a) Open DO Settings, go to "Folder formats", right-click on "Path Formats" and select "Add" - then select the folder where you want to apply the tiles.
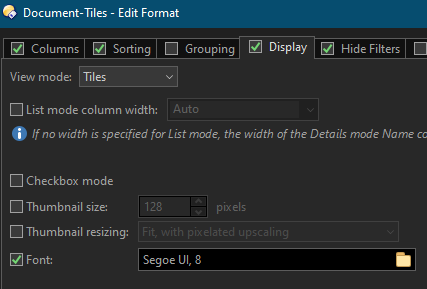
b) In the "Display" tab, select View mode = Tiles.
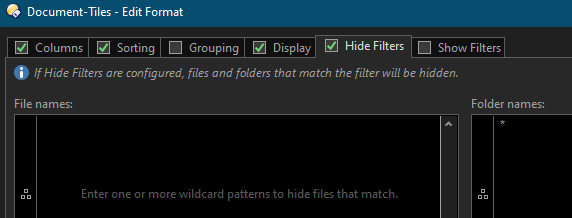
c) (optional) In the "Hide Filters" tab, put an asterisk in the "Folder names" window if you want to hide any folders in the Tiles view (trust me, this improves the overview if you work with subfolders - and you can always change folders in the folder hierarchy anyway).
d) Finally, at the bottom, check the box to use this configuration as "the default format for all subfolders" - and confirm with the OK-button.

BUTTON
It is recommended to add a small button to DO to switch quickly between the Default view and the Tiles view. I'll not describe how to add a button (see the documentation) but here is a simple code for such a button, in Standard DO script:
@ifset:VIEW=Tiles
Set VIEW=Details
@ifset:else
Set VIEW=Tiles
Show VIEWERCMD=zoom,reset
VB macros
Last but not least: the VB macro I use in Word (via Developer - Visual Basic - and creating a new module for the "normal" template - you can find further documentation on the web).
'=============================================
' MACROS TO SET DOCUMENT TITLES IN COMMENTS
'=============================================
'2 macros to save a single document:
'The first to use within Word...
Public Sub SaveTitlesThisDocument()
    Dim objDoc As Document
    Set objDoc = ActiveDocument
    Call SaveTitlesToComment(objDoc)
End Sub
'The second to use in a Windows "Send To" shortcut...
Public Sub SaveTitlesThisDocumentAndQuit()
    Dim objDoc As Document
    Set objDoc = ActiveDocument
    Call SaveTitlesToComment(objDoc)
    Application.Quit
End Sub

'2 macros to save titles for all documents in a folder:
'The first to use within Word...
Public Sub SaveTitlesThisFolder()
    Call SaveTitlesToCommentThisFolder
End Sub
'The second to use in a Windows "Send To" shortcut...
Public Sub SaveTitlesThisFolderAndQuit()
    Call SaveTitlesToCommentThisFolder
    Application.Quit
End Sub
'Subroutine used by the multi-document macros
Public Sub SaveTitlesToCommentThisFolder()
    Dim fileDirectory, vFile
    Dim objDoc As Word.Document
    fileDirectory = ActiveDocument.Path
    If ActiveDocument.Saved = False Then ActiveDocument.Save 'Save current document first
    Application.ScreenUpdating = False 'Prevent screen flickering
    vFile = Dir(fileDirectory & "\*.doc*")
    Do While vFile <> ""
        Set objDoc = Documents.Open(fileDirectory & "\" & vFile)
        Application.StatusBar = fileDirectory & "\" & objDoc.Name 'Show in status bar where we are...
        Call SaveTitlesToComment(objDoc)
        objDoc.Close
        vFile = Dir
    Loop
    Application.ScreenUpdating = True
    Application.StatusBar = False 'Return control of status bar to Word
End Sub

'The core logic for all previous macros, to put titles into the comments field
Public Sub SaveTitlesToComment(ByRef objDoc As Word.Document)
    Dim rng As Word.Range
    Dim arrHeadings As Variant
    Dim strComment As String, strText As String
    Dim intItem As Integer, intLevel As Integer
    Set rng = objDoc.Content
    strComment = ""
    stopNumbering = False
    suspendNumbering = False
    With objDoc
        Set rng = .Content
        If .BuiltInDocumentProperties("Comments").Value <> "" Then
            .BuiltInDocumentProperties("Comments").Value = ""
        End If
        arrHeadings = .GetCrossReferenceItems(wdRefTypeHeading)
        For intItem = LBound(arrHeadings) To UBound(arrHeadings)
            'Get the text and the level
            strText = Trim$(arrHeadings(intItem))

            'Prepend 'real' titles with an incremental number:
            strText = CStr(intItem) & "-" & strText

            'Directory Opus tiles view shows first 5 titles, so add an indication
            'if there are more titles to follow (real or not real ones):
            If intItem = 5 And UBound(arrHeadings) > 5 Then
                Dim strFF As String: strFF = " "
                Dim i As Integer
                For i = intItem To UBound(arrHeadings) - 1
                    'We add as many tokens as there are unvisible entries...
                    strFF = strFF & ChrW(9660)
                Next
                strText = strText & strFF
            End If
            strComment = strComment & strText & vbNewLine
        Next intItem
        If strComment = "" Then
            'For some reason, non-empty documents keep asking to be saved
            'even if no titles were found (empty strComment). So we set
            'the Saved parameter explicitly to True to avoid unnecessary saving:
            .Saved = True
        Else
            .BuiltInDocumentProperties("Comments").Value = strComment
            .Saved = False
            .Save
        End If
    End With
End Sub
SendTo shortcuts
I think this is really the last thing I did: I added two shortcuts to the windows context menu, that allow me to right-click on a document tile and choose either to rebuild the titles of that document, or to rebuild the tiles for all documents in the same folder. This uses two macros that are included above in the VBScript.
You create two shortcuts in the right location - for windows 10 this is:
C:\Users\berna\AppData\Roaming\Microsoft\Windows\SendTo
A shortcut e.g. named "Renew Titles for this Doc" must contain the following command in the "Target" field:
"C:\Program Files (x86)\Microsoft Office\root\Office16\WINWORD.EXE" /mSaveTitlesThisDocumentAndQuit
Adapt the path if needed.
The second shortcut, e.g. "Renew Titles for the entire folder" contains the same command but with another macro at the end:
/mSaveTitlesThisFolderAndQuit
You should then find both in the context menu:
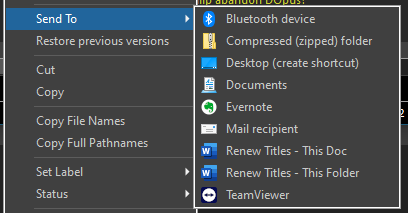
That's it.
Some suggestions
-
Dynamic tile size as an option would be great. I remember some users in the past having asked if the description column or even the filename column could be more dynamic, wrapping text if it does not fit within the column width. It seems to me that tiles do offer this kind of solution. In fact I once used a tiles view which is twice as wide as the ones used here, and only 2 lines high - which let me see all ebooks or other files in a folder with full descriptions underneath the file names. Yet, I cannot use both of these solutions at the same time: I would have to edit the tiles settings to switch between my Word document solution and the great ebooks overview. And it is only the static size for tiles that prevents this kind of flexibility. If Preferences > Tiles (File Display Modes) Label size (characters x minimum lines) would be accessible through code in buttons, that could be a real game changer in the way we use Tiles.
-
DO could probably support preserving the CR/LF when they occur in a multi-line dialog field, rather than cutting off everything after the first CR/LF. I don't know why that would not be possible - it can certainly and correctly show comments that include such line breaks. This is not needed for the current use case - but more in general I do edit usercomments often, and this issue is a serious limitation when using the Dialog function (multiline edit field).