I was asked
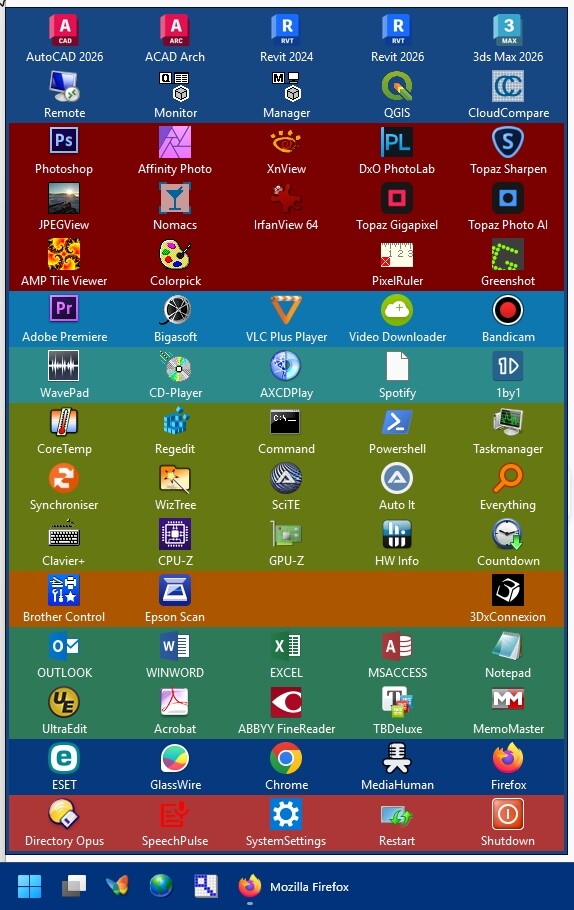
by Ms3o to share how I made my Windows Startmenu replacement. I was very satisfied for a long time with the start menu of Windows 7. So I used it for several years under Windows 10 with the Tool "Classic Start Menu". Only maybe three years ago I became friends with the tile menu of Windows 10 and then found it very nice because of the possibility to sort the programs according to their categories and to enter a headline for it. I switched to Win 11 2 months ago. The Windows 11 start menu doesn't really deserve its name. The number of users who try to change their start menu with other programs should go to the millions. The restrictions for the user to change the Windows user interface are getting bigger and bigger with every update. Clearly visible also on the task bar. So I have invested some time and created something that fits me very well with the help of Directory Opus. Maybe it serves others as inspiration and we can learn from each other.
-
At first I created a new toolbar ( I call it Startmenu). In this one I have draged in a whole series of programs. It's so easy. In Custumize Mode you can either drag the desktop links into the toolbar or you open a lister in which the programs are located and drag them from there into the toolbar. Every time you do that, you get a dialog box "Launch options" where you can set your prefered options. I usually deactivate the option "Send files and folders to the program" here. If you do not do this, it can happen that when you call a program via the start menu, all currently marked files in an open Lister will be transferred to the program. For example: You have 20 photos marked in a lister and click on Photoshop, then all these 20 photos will be loaded into Photoshop, which can be quite time consuming. I have not yet dealt with the other options, but I can imagine that the Dopus team has thought of everything and there are some useful options to explore. When the toolbar is filled to it´s end go to the next step.
-
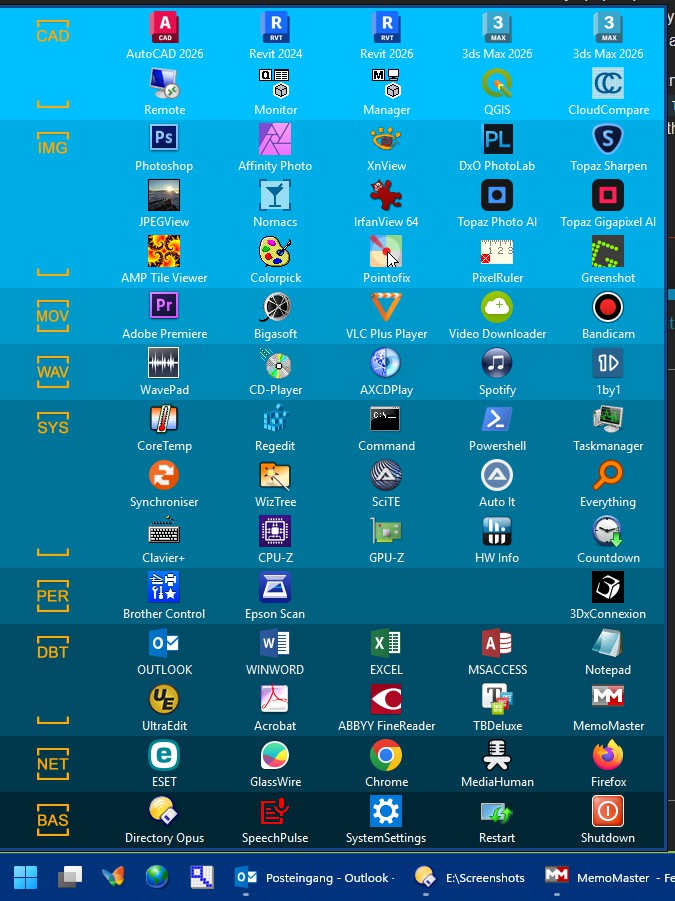
Make the Toolbar floating and leave the customize mode. Right click on an edge of the toolbar and in the context menu under "Appearance" you have to switch on the "Same Sized buttons" option. The length of the longest of the label names is crucial for the width of the all buttons. Now you can pull on the corner of the toolbar and you can determine how many columns and rows the start menu should have.
-
Back in custumize mode you can now populate the floating toolbar with more and more programs or functions. You can do this again with the method described above.When ready you can start sorting the buttons by simply dragging them to the place where you want them with the left mouse button pressed.
-
For the empty buttons I used the command
Toolbar Startmenu CLOSE. Thus, the start menu is closed when you click on an empty button. -
Now the program buttons have to be colored according to their category. To do this, click in Customize Mode with the right mouse button on a button. Under "Edit...." you can now adjust the background color for the first button. Now you can copy the RGB values and transfer them to the other buttons of the same category.
-
When you're done with this, you can leave the Customize Mode. Now you move the start menu to the place you want to have it and use the right mouse button to click on an edge of the toolbar. Here you can now lock the position of the toolbar.
-
Procedure to call the Startmenu with a button in the task bar: Go back to the Customize Mode and create a new user command with the name Starter. Enter the following code into the command window.
Toolbar AUTOCLOSE NAME="Startmenu" STATE=float TOGGLE
Close the window and leave the Customize Mode. -
Make a desktop link for the dopusrt.exe. You will find it at "C:\Program Files\GPSoftware\Directory Opus" Now click on the link with the right mouse button and open the properties window. Type the following as a target here.
"C:\Program Files\GPSoftware\Directory Opus\dopusrt.exe" /acmd Starter
Look for an matching icon for it. For example I used the butterfly from the%SystemRoot%\System32\shell32.dllClose the properties window. -
Pull the link to the taskbar to your desired position. Test it! If you now click on your Starter button in the task bar, the Startmenu opens. If you click on one of the programs, they will be opened and the start menu closes. When you click on one of the empty areas or on the taskbar button the start menu also closes.
-
Here are the buttons for restarting and shutdown the computer. Create batch files with the following content. For restart.
%windir%\system32\shutdown.exe /r /f /t 0
For shutdown.
%windir%\system32\shutdown.exe /s
Then create links to the batch files on your desktop, give them a fitting icon and drag the links to your start menu in custumize mode -
System settings: there was no way for me to get the new system settings get to work with a button. There is a systemsettings.exe running in the taskmanager, but I found no way to get the system settings runnung by executing that command. But as Win11 isn´t that totally new as proclaimed by Microsoft you also have the old control panel which you can execute with the control.exe. So in that button the command is nothing more than
control.exe -
Recent files for a program: For Word or Excel or Access, you can see the last used files by clicking the right mouse button on a program symbol in the start menu of Windows 11. I simulated this through a "three button button" in my start menu . For the right mouseclick i have added the following command:
Go PATH="/appdata\Microsoft\Office\Recent" FOLDERCONTENT=nodirs
Sadly I was not able to distinguish between Word, Axcel or Access, but for me it is enough. May be that some filter can do the job.