Please note: Part of this tutorial describes a way to create a Three-Button with menus on the left/right/middle-click actions. This is not officially supported by Opus and may cause some cosmetic problems or other small oddities in some situations. Strictly, Three-Buttons should only run commands on each action while menus should be confined to simple sub-menus and Button-Menus (like the Back button).
Triple Drive Buttons (How to lose the tree) (step-by-step)
Author: Gus Wrethman
Introduction
Directory Opus 8 (Opus from now on) provides so many navigation methods, that they can be easily overlooked, especially if you are used to a standard Windows Explorer method of navigation, which is generally via the tree in combination with Back/Forward and favourites. Whilst this method works to a degree, it is a very long way from being the quickest method. Opus provides us with a default Drivebar (called "Drives") and this is a big improvement in the navigation stakes, but it is not perfect, mainly because its functionality is only 33% of what it could be.
GASP!
"Why is this so?" you may ask.
It is because the drivebar only uses a left mouse button (LMB from now on) function, when all Opus buttons can support up to three functions, namely "Left Mouse Button", "Right Mouse Button" (RMB) and "Middle Mouse Button" (MMB). The default drivebar does actually provide a generic RMB function, but this a global function, not a local one, in other words, it is the same for every button on the drivebar, not unique to each button. This tutorial will explain in detail, a step by step method of creating a different type of drivebar, one that you may find very useful.
I know I do. 
Even if you do not find this drivebar useful, you may learn some Opus tricks by following this tutorial. Reading it alone will probably not be of much use, as many of the tasks involved may be unknown to some users, so it is best that you "read and do." The instructions are detailed, so try not to jump the gun or second guess what I am doing.
This drivebar will really only have practical applications IF you have several hard disks and/or partitions, although its general concept could equally be applied if you only had a C:\ drive. What we will create is a drivebar that has one button for each drive, and that one button will have three functions (LMB, RMB, MMB) not just the one function as the current drivebar buttons have. A left click will take us to the root of the given drive, a right click will bring up a menu containing both static hard coded "Favourites" as well as "Recents", and a middle click will perform a "Properties" on the selected items in a lister.
I will not cover the eye-candy aspects of toolbar creation, that is a whole tutorial in itself, this will simply deal with the mechanics of creating the toolbar, and I will leave its appearance for you to do with as you will.
This tutorial assumes Opus 8, and it is likely that some of the methods used here will not work in Opus 6, although MOST will. In other words, if you have Opus 8, you can simply follow what this says and it will work, whereas if you have Opus 6, you may have to wing it occasionally.
The main purpose of this drivebar is functionality over form. It IS the supreme method of navigation and maybe you will find it so good, those of you who still use standard Windows navigation methods (did somebody say tree?) may abandon them altogether. The tree has its uses, but navigation is not one of them
Making the toolbar
Anyway, enough of the preamble, let's make a toolbar. Oh, before we start, when I say "enter customise mode" I mean choose "Customise" from the settings menu.
Ok, start Opus up and enter customise mode. This will open up a window that has four tabs, Commands, Toolbars, Keys and Context Menus. Click on the Toolbars tab.
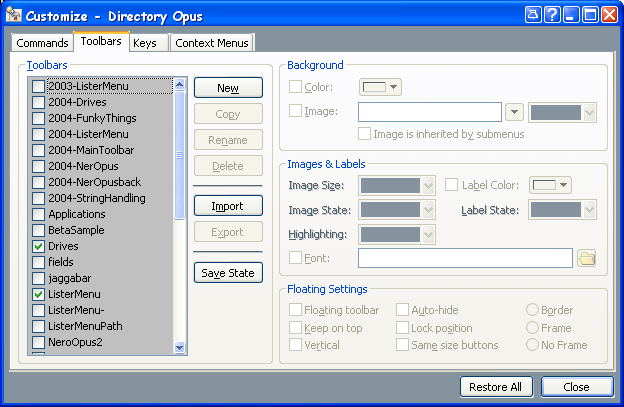
If you have not already done so, maximise Opus so it is taking up the whole screen (so you can see the changes as we apply them). Also, make sure that the Customise window is NOT maximised and is in its normal state (around something slightly less than a quarter of your screen). In the left of the window, you will see a list of all the toolbars Opus has available now. This list may be very long or quite short, depending on the number of toolbars it contains. You will notice that some toolbars have a checkbox next to them, and some do not. The ones that are checked now, are in use now, and the ones unchecked, are ones just waiting for you to click that checkbox to turn them on.
Click on NEW. This will open a window that is asking for a NAME for your new toolbar. This window should be pointing at the Buttons directory in the main Opus directory. If it is NOT pointing at the buttons directory, navigate to it now, so that it is, (the default path is "C:\Program Files\GPSoftware\Directory Opus\Buttons".) Give your new toolbar a new name, lets call it say.... "drivetest". The suffix ".dop" is automatically appended to this. Of course, this name can be changed later, or if you wish, call it something entirely different now, but just remember that I will be referring to the toolbar that I call "drivetest" throughout this tutorial.
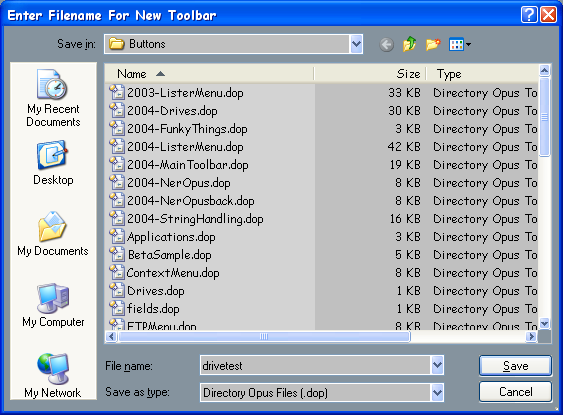
Ok, so you have given the toolbar a name (drivetest) now click SAVE. The window will close, and you will now see in the left section of the customise window your new toolbar.
It will be checked and will be visible (as a blank toolbar) in your Opus lister(s). Uncheck your toolbar and watch it disappear. Check it again and watch it re-appear. This is ONE of the many methods that Opus provides for turning toolbars on and off.
Before I continue, let me quickly explain what Opus means by "toolbar". A toolbar is simply a thing that contains "buttons". Windows itself generally makes a distinction between a "toolbar" and a "menu bar" whereas Opus does not. The only difference between what appears in Opus as a standard menu (text) and a toolbar (icons, text/icons), is that the standard menu is showing text and no icons, and the standard toolbar is showing icons and no text. Now that this is now as clear as mud, let's continue.
We should still be in customise mode and we should have "drivetest" checked. If it is not checked, check it now so that the new blank toolbar is shown in Opus. Note that clicking on the word drivetest is NOT the same as checking it. Clicking on the toolbar name merely "selects" it (for editing). To check (or turn on/off) the toolbar, you need to actually click IN the little checkbox to the left of the toolbar name.
Making sure that your drivetest is checked, now also select it by clicking on the name drivetest rather than the checkbox. Now we can edit some of its characteristics. The right section of this window contains the various options that will control how the toolbar looks. As I said before, I will not go into detail here, but I will touch briefly on a few of the controls, just to give you some idea of what they do. Let's start off with a blank slate, so uncheck any boxes that are checked in the three sections (Background, Images & Labels, and Floating Settings) and also set all available dropdowns to "default".
Your drivebar will now be a very blank, very bland thing. Check the "Colour" box and you will see that the colour dropdown now is available. Pick some outlandish colour from the drop down menu and watch your toolbar change as you select various colours. While you are in the Opus colour chooser, notice the eyedropper? Did you ever wonder what this is for? It is a very very handy tool indeed that allows you to "pick-up" a colour from another source eg. a screen grab, another program, or a web page for example...
Say you saw a screen grab of someone's Opus setup and you really liked one of the colours that he was using. You could use the eyedropper tool to "pick up" that nice colour and borrow it, and add it to your own Opus. Let's pretend that YOUR opus lister was actually a picture that you have on your HDD of someone's Opus screen.
Whilst still in the Opus colour chooser, click and HOLD, on the eyedropper tool. Remember, "click" means LEFT click. Any other kind of clicks will implicitly state the type of click. Anyway, click and hold on the eyedropper tool, then drag your mouse all around your screen and watch what happens. You will see that whatever colour is currently under the mouse, will be reflected as a change to your toolbar colour. If reading this doesn't make sense, just try it and you will instantly see what I mean. Once you have finished playing here, and you have a colour that suits (let's pretend it is a shade of blue), click on CLOSE and exit customise mode. You should now have a blank blue toolbar in your Opus lister(s). If you do not, one of us has made a mistake

Let's assume that you have 5 partitions, labelled C: through G: I realise many people will have more, and many will have less, but we will assume 5 for now. We will deal with floppies, zips, CDs etc later. For now, we will deal with physical hard disks and/or partitions and we are assuming five of these.
RMB on your new blue drivetest toolbar and a menu will appear. One of the menu entries will be "Toolbars", and you will see that this entry has a ">" next to it, indicating that it has sub-menus. Pull down to the Toolbars menu entry and you will see the sub-menu appear. This sub-menu contains all of the currently available toolbars, and you will see that "drivetest" has a check mark next to it, meaning that it is enabled. Now move across into the sub-menu and uncheck drivetest by clicking on it. Our drivetest toolbar closes and this is one way to turn OFF a toolbar. Now RMB on any other toolbar, and turn drivetest back on. This is one way of turning ON a toolbar. If you don't have any other toolbars available, just go back to the Toolbars tab in the customise mode window and re-enable the drivetest toolbar from there.
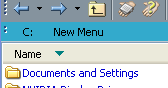
So, we are back with our blank blue toolbar. Minimise the customise window, because we don't really need it at the moment. RMB anywhere on your new toolbar and pull down to NEW on the menu, and from the sub-menu choose NEW BUTTON. You will see a new button appear, whose name is "New Button" (strangely enough). If the new button has an image, or does not say new button, or is in some weird colour, don't worry about it for now. Other things affect the way that buttons appear, but if you followed my instructions so far, yours SHOULD say simply "New Button".
Exit customise mode. (Remember that we minimised it!)
Click on the New Button. Nothing happens. This is because we need to add stuff to the button to make it work and do things for us. Now, hold down the ALT key and click on the new button. Two windows will open!
"But I only see one window?" you may say, but if you look up (or down as the case may be) at your task bar, you will see a minimised Customise window. Alt clicking a button or menu item opens THAT button or menu item in customise mode. This is a very handy quick way of editing command buttons. The reason that the customise window opens minimised is because in MOST cases, it is just in the way when we want to perform a simple edit.
(Editors Note: This minimizing behaviour can be modified in Preferences - Toolbars - Options)
In the "Command Editor" window, click on the CANCEL button. This closes the command editor window, AND exits customise mode. This is because customise mode was called locally via Alt Click. In other words, Opus is saying, "oh, he alt-clicked, that means he wants to edit one button quickly, then get out of here." If we enter customise mode globally, via RMB on any toolbar and choosing "Customise", or via the "Settings--Customise" Menu closing the command editor will NOT also exit customise mode. This is because Opus is saying, "he is customising stuff, so I better not close until he tells me to." When I say "enter customise mode," I mean enter it globally, NOT via Alt clicking.
Remember that we want our drive buttons to have the added functionality of RMB and MMB functions. To do this, we need to change the button to a "triple button," or a "three button" button, the three functions being LMB, RMB and MMB in that order. If you are not in customise mode now, enter customise mode.
To make our single button into a triple button, RMB on the button itself and choose "THREE BUTTONS" from the menu.
Once you do this, you will see a kind of sub-button or sub-menu really, that also says "New Button". I will explain why this is so shortly. If you click on the TOOLBAR "New Button" the sub-menu item should toggle itself on and off (or open and closed). Having two buttons with the same name is confusing in a way, so we need to make a distinction between the top level button, and the sub-menu item that it contains. Close the sub-menu. You do not HAVE to do this, but let's make it as non-confusing as possible. Remember that to open or close the sub-menu in a triple button when customising, you just need to click on the actual top level button itself.
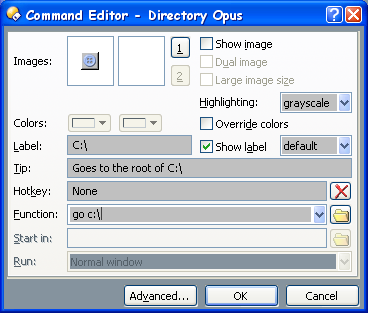
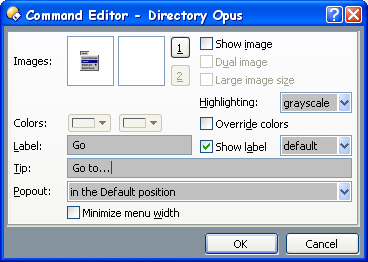
RMB on the toolbar's New Button and choose EDIT from the menu. You will be back in the Command Editor.
Uncheck "Show Image" and "Override Colours"
Check "Show Label" and set the drop down next to this to "default".
In the text string next to "Label:" (where it now says "New Button") change it to say, "C:" (without the quotes of course.) Click on OK and the command editor closes, and now your button says "C:" Now when you click on it, the sub-menu button and its 'parent' are different.
Now click on your new button, (so that the sub-menu is exposed), and double click on "New Button", and you will be back in the Command Editor. Click CANCEL again (remember this does not EXIT customise mode) and instead of double clicking on the button, RMB on "New Button" and choose EDIT. These are two ways to achieve the same end. Now click CANCEL again, closing the command editor while still remaining in customise mode.
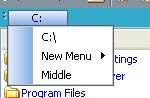
If needed, click on your button "C:" so the sub-menu "New Button" is showing. Pull the mouse down slightly into the actual menu area, so that the words "New Button" are highlighted. Whilst "New Button" is highlighted, RMB and choose COPY from the menu. Move the mouse back up if needed so that "New Button" is again highlighted, and RMB and choose PASTE. You will now have two entries in your sub-menu, both called "New Button". RMB again and choose PASTE a second time. Now you have three entries called "New Button". Each one of these will soon become a function, one for LMB, one for RMB and one for MMB.
RMB on the topmost of the three identical buttons and choose EDIT.
The command editor window opens.
Do not include the quotes unless specifically stated.
In Label: (where it now says "New Button") type "C:" (Yes include the backslash)
In Tip: type "Goes to the root of C:"
Hotkey: Leave as none
Function:, Start in: and Run: Leave alone for now.
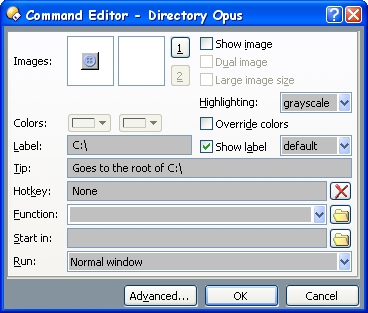
Click OK and the command editor will close and hopefully you will see your top level button (called C:) and the three sub-menu items it contains, called C:, New Button, and New Button respectively. The backslash in the first button by the way has NO purpose except as a visual aid in this exercise, because the initial button (called just C:) and the topmost of the three sub-menu buttons (called C:) are two very different things. We just need to make a couple of further changes, and I will explain this further.
RMB on the second item in the sub-menu, which should be the first instance of "New Button", and from the menu, choose EDIT. Change the Label: from "New Button" to "Right" and change the Tip: to "Menu Function" Click ok and exit the command editor. Now repeat this for the third item in the menu and give it the label of Middle and a tip of "spare function". Now exit the command editor. You should now have 3 distinctly different buttons in the sub-menu of the button called "C:", these being C:, Right, and Middle respectively.
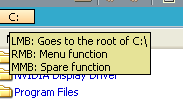
Exit customise mode by clicking CLOSE in the customise window. Hover the mouse over your new button and after a short time, you will see a tool tip window pop open. It should list three possible functions like this...
LMB: Goes to the root of C:
RMB: Menu Function
MMB: Spare function
If it does not, we have a problem
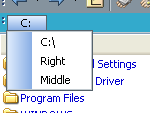
Let's assume that all is well and continue.
Now click on the C: button and hold. You will see that instead of saying "C:", it now says "C:", indicating that this is the function that will be executed when we left click on the button. Now try RMB and holding, it says "Right". Next try MMB and holding, it says Middle.
![]()
Of course, we haven't actually put in any commands to make ANY of these buttons do anything yet, but at least now you can SEE how to make a triple button and how the mechanics of it work.
You may also see that a triple button is not really a triple button, it is really a triple button plus one, because the topmost 'part' of our button is not really a button in the true Opus sense of one, it is more a 'container' that holds the menu that contains our three buttons. If this is unclear, try this.
Enter customise mode
RMB on your C: button and choose EDIT
As you can see, none of the information or labels or tool tips are here, in fact nothing is here at all. We can't even enter a function for this button, because it is a container, more than a button. So, think of a triple button as three commands that are in a menu, that are held in a container. A double button by the way is simply a triple button minus the MMB function.
It is time to actually make this button DO something
Click CANCEL and close the command editor, but stay in customise mode. Click on your C: button to expose the sub-menu and RMB on the C:\ and choose EDIT.
In the window, you will see "Function:"
Click in the box next to this and type, "Go C:" (WITHOUT the quotes)
Click ok
Exit customise mode
Click on your button.
VOILA!
You are at the root of C:
If by chance you were already at the root of C:, go somewhere else, then click on your button.
Now, we need to make the right mouse function do something too. Enter customise mode, click on C: to open the sub-menu. We have our three buttons, one of which so far takes us to C:\ and the other two that as yet do nothing. There is a slight problem. We want a MENU to appear when we RMB on our C: button, yet the way we have constructed the triple button so far makes no allowance for a menu!
RMB on the second item (should be called "Right") and from the menu, choose DELETE.
Now RMB anywhere in our sub-menu, and choose INSERT NEW.
You will see that there is only one entry here, and that is "New Button", when what we want is a menu.
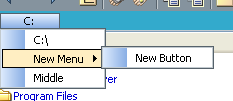
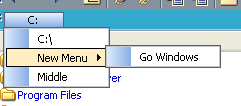
Move the mouse away from your button and RMB somewhere on your blank toolbar, and choose, NEW. In the sub-menu of NEW, you will see that from here we CAN make a new menu item, so choose "NEW MENU". DO NOT CHOOSE "NEW MENU BUTTON" as this is a slightly different thing. You now have a second button on your toolbar called "New Menu"
RMB on the "New Menu" button and choose CUT. Notice that "New Menu" is now slightly ghosted. This indicates that it has been "CUT". Now click on your C: button to open the sub-menu, pull the mouse down slightly so that you are somewhere in the sub-menu, RMB, and choose PASTE.
You should now have a menu that has three items again, namely..
C:\
New Menu >
Middle
Depending on where your mouse was exactly when you chose PASTE, the actual order that you have may differ.
The order that these commands appear in this sub-menu is actually vital. From TOP to BOTTOM, they refer to the LMB, RMB, MMB functions, so in the example above "C:" is the left mouse function, "New Menu >" is the right mouse function, and "Middle" the middle mouse function. Let's say that you wanted to change the order of these sub-menu items. Click and hold on whichever item you wish to move, and just drag it up or down in the menu. This is pretty much Windows standard. Once you have arranged the menu to match the above, click on the "New Menu" item and you will see a sub-menu appear. RMB in this new sub-menu, and choose "New Button", then RMB on your "New Button" and choose EDIT.
Make the following changes/additions.
Label: Go Windows
Tip: Goes to C:\Windows
Hotkey: (leave as NONE)
Function: Go C:\Windows
Start in: (leave blank)
Run: (leave as Normal Window)
Click OK and close the Command Editor
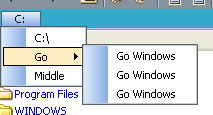
Now you should see something like this....
C: <--- top level button, or "container"
C:\ <--- our working LMB function that takes us to the root of C:
New Menu > Go Windows <--- we just made this and have not tested it yet
Middle <--- as yet does not do anything
Exit customise mode and RMB on the C: button. What you should see is a popup menu that says "Go Windows".
Bear in mind, the "wording" of the buttons here is meaningless, it could equally say just "Windows", or "Windoze", or "!@%^!" but "Go Windows" makes sense to me since that is what happens. In other words, the label means nothing really, it is only the function that counts.
Click on it, and in theory, you will now be in your Windows directory. Now LMB on the C: button and you will be back at C:\
So far so good!
LMB = C:\ and RMB = Menu (that so far takes us to C:\Windows)
Enter Customise Mode, click on C: to expose its sub-menu, then RMB on the second item, called "New Menu" and change its Label: to read "Go" and the Tip: to read " Go to..."
Click Ok, and exit the command editor.
Click on the second sub-menu item, now called "Go" and this will open its sub-menu. RMB on Go Windows, choose COPY from the menu and then with the pointer somewhere in this second sub-menu, choose PASTE, you should now have two commands called Go Windows, now choose PASTE again, so your sub-menu has three items called Go Windows.
RMB on the second of these commands and choose EDIT
Edit the command so that it says...
Label: Go Program Files
Tip: Goes to C:\Program Files
Hotkey: (leave as none)
Function: Go "c:\program files" <--- these quotes ARE to be included!!!! They are needed to delimit the path
Start in and Run (leave)
Click ok and exit the command editor. Exit customise mode.
Test your new button with right and left clicks.
Nifty eh? Is the tree dead yet?
We need to add a few more things to it before we use it as a "base" for our other drive buttons.
Enter customise mode, click on C: to expand the menu then click on Go to expand that menu, now RMB on the third entry, namely Go Windows, choose COPY from the menu, then PASTE in a fourth command and PASTE again for a fifth. Our "Go" sub menu now should have five items, Go Windows, Go Program Files, and three more instances of Go Windows. The first two entries are as we want them, so RMB on the third entry and choose EDIT.
Edit the command so that it says...
Label: Go Documents and Settings
Tip: Goes to C:\Documents and Settings
Hotkey: (leave as none)
Function: Go "c:\Documents and Settings" <--- these quotes ARE to be included!!!! They are needed to delimit the path
Start in and Run (leave)
Click ok to exit the command editor, and RMB on the fourth entry (still called "Go Windows"), choose EDIT and..
Edit the command so that it says...
Label: Go Opus
Tip: Goes to Opus
Hotkey: (leave as none)
Function: Go "c:\program files\gpsoftware\directory opus" <--- these quotes ARE to be included!!!! They are needed to delimit the path
Start in and Run (leave)
Click ok to exit the command editor, and RMB on the fourth entry (now called "Go Opus") and from the menu choose "Begin a Group"
Exit customise mode and admire your work!
Almost done now, just one to go. This one is a little different to the others. Instead of using a predefined static path, it uses an Opus command called "Recent" and adds the argument "C:" The "recent" command basically allows you to return in one click to any directory that you have 'recently' visited. The circumstances that determine whether a visited directory is considered to be 'recently' visited are determined by settings in Preferences -- Favourites & Recent -- Recent List. The addition of the C: argument to the "Recent" command makes a kind of filter, in that ONLY recent directories on the C: drive will be displayed. The advantage of this is that if you are working on the C: drive, you probably don't NEED to see stuff that was recently visited on another drive. You could easily add a button or a menu item that did NOT include the C: argument, so you COULD indeed see all recently traversed directories, but for now, we will stick with Recent C:
Enter customise mode and edit the fifth (and last) command in our Go menu so that it reads..
Label: Recent C:
Tip: Goes to C:\ recents
Hotkey: (leave as none)
Function: recent path c:\
Start in and Run (leave)
Click OK and exit the command editor, RMB on your "Recent C:" button and choose "Begin a group" from the menu.
Exit customise mode.
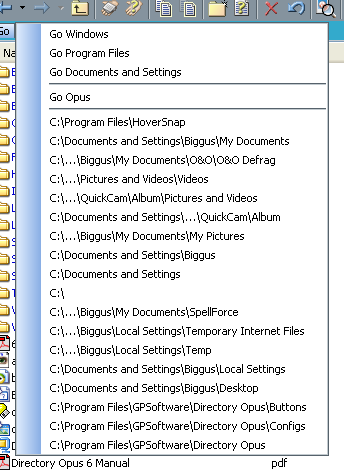
Now RMB on your button and you should hopefully see three 'groups' of menu items, namely a "Windowsy system type" group, a "programs group" (although we only have Opus here) and the "recent" group, which may or may not even appear on your setup. As I said, the contents of this menu item group are in flux and depend on what and how many directories you have recently been to, in conjunction with the recent setting in Prefs. (Preferences -- Favourites & Recent -- Recent List) so if there is no third group, don't panic, it will appear when it needs to. (Currently, mine looks like this... )
We need to add the final MMB function to our button, so enter customise mode, click on C:, RMB on "Middle", choose edit and make the button say...
Label: Properties
Tip: Properties of selected files
Hotkey: (leave as none)
Function: properties
Start in and Run (leave)
Exit customise mode.
Note that this MMB function will ONLY work IF files and/or directories are selected. Nothing will happen otherwise.
You may notice that your C: button has become much wider than it was before. This is because the button needs to grow to accommodate the MMB text "Properties". "Go" and "C:" are both quite short, so the much longer "Properties" forces the button to grow. It may make sense to shorten the label to say "Prop". The label really is not all THAT important, so long as we have a decent tool tip to tell us what our abbreviated label button actually does. Edit the "Properties" Label if you wish.
Ok, now we have made our ONE button. This text may have taken a long time to read and follow, in order to create the button, but once you become practiced at button making, this whole process would take less than a minute. Anyway, what we need to do now is to clone our first button, once for each of the 'drives' that I mentioned at the start.
Enter customise mode, and RMB on your C: button and choose COPY from the menu. DO NOT EXPAND the button to show its sub-menu items, we want to get the whole button here, not just part of it. Now RMB on your toolbar, and choose PASTE and paste in four extra C: buttons, so that you have a total of 5. Now edit the rightmost four buttons (the top level button) so that their labels are correct, then exit customise mode.
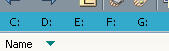
Your drivebar now looks like this:
C: D: E: F: G:
Plainly, at THIS stage, all the buttons are identical, barring their labels, but editing the hard coded paths is quite simple and quick. For now, we will leave the hard coded paths alone, because plainly I cannot guess what paths may exist on your machine, but what we can change, and what will work, is the "recent" paths, so edit each of the four RMB commands, so that the "Recent C:" in each, becomes "Recent D:", "Recent E:" and so on. Don't forget to change the label and tool tip as well. Make these changes to the four buttons and exit customise mode.
Now RMB on each of your buttons and you may well see that the "Recent" command has magically added some recently traversed or visited directories for you.
Have a think later on what hard coded paths you intend to add to each button, but do not be tempted to go overboard here, because that defeats the purpose of this whole method. This is supposed to be a QUICK and simple method of navigation, and constructing a menu that has dozens of items is not such a great idea.
Remember that the "Recent" menu item will take you to directories that you recently worked in anyway, and your hard coded favourites will take you to them, so adding any less used paths simply clutters up your menu and makes it unnecessarily long and hard to read and navigate. Remember, sometimes less is more!
We need to do a few more things quickly to the toolbar to make it more functional. Enter customise mode and push and hold the Control key. Now click on the rightmost of your buttons (should be G: ) and drag the mouse to the right, along your toolbar. Control dragging is a quick way of duplicating a button. Repeat this and you should now have two copies of your G: button.
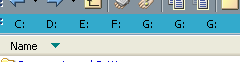
Your drivebar now looks like this:
C: D: E: F: G: G: G:
Let's assume that you have both a CDROM and a DVD drive. Edit the rightmost two G: buttons to reflect your own CD/DVD drive letters. (Mine are W: and V: respectively) On an unrelated note, there is a very good reason why my CD and DVD have letters at the end of the alphabet. Do YOU know why?
Anyway, now we have...
C: D: E: F: G: W: V:
We need a way to separate or distinguish at a glance, the two "types" of drives (hard disks as opposed to CD drives). Opus uses a "separator" to do this. The simplest way to add a separator is to enter customise mode, click on the drive that is to be the FIRST in the new group, and drag it slightly to the RIGHT. To remove a separator, drag slightly to the LEFT. If you find this cumbersome, you can also RMB on a button and choose "Begin a group" to add/remove a separator. Hmm, looks ok, but it might be annoying to have W before V, so we need to swap the two buttons. To swap or move a button, just click on it and drag it to whatever position you prefer, then release.
Open your customise window and go to the Commands tab, and in the left window (Category) select "Go" and in the right window, scroll down until you can see an entry called "Path Field (Recent List)". Click on this and drag it onto your toolbar anywhere to the right of your button group. Now go to the "View" Category, and find the command "Show Files Field" and drag that to your toolbar, to the right of the Location field.
Exit customise mode.
At this point, you may or may not be satisfied with the size and positioning of the two new field buttons. This will depend a lot on the resolution you are working in, and the size of the lister that you are using. The rationale of using the "Location Recent" button here, is that it is also a very good navigation tool, AND as it is also a global one. It will show the recently traversed directories across ALL your drives, rather than just the local recents that you made in the individual buttons. BOTH local and global have their uses, and I see this method as a way of separating the two, thus being able to enjoy the best of both worlds.
The "Show Files" button is a handy way of hiding/showing patterns of files using standard wildcards. For example, ".jpg" would show all jpg files, ".(htm|txt)" would show all files that were txt or htm extensions and so on. A blank field or "." will revert to showing all filetypes. This field has a history dropdown so you can quickly filter on previous patterns.
You may or may not like the labels next to the two new buttons, so turn these labels off if you wish, by entering customise mode and editing the buttons, turning off "Show label". You may also wish to adjust the width of these buttons. You do this by dragging the outline that represents the button in customise mode so that it is the desired width.

Ok, that just about does it for this tutorial. I could prattle on with other methods of adjusting and prettifying this toolbar, but that is best left for another time.
Now that you have your new all-singing all-dancing toolbar, you may find that tree is a far less efficient method of navigation than you previously thought, and hopefully now it can be turned off and banished to the place where it belongs.
TIMMMMMMMMMMBBBBER!

 )... are the images gone? i cant see the images with IE8 or FF3.x or FF4.0. And it doesnt say (in 1 or 2 sentences) what the end result will be, after all the work. Is the tutorial still "valid" or "needed" for Dopus10 releases? And why cant the drive button be shared? Please add the images (or the final button code), i am so confused!